Tips to Continue to Protect Yourself as Missouri Re-Opens

As the state re-opens due to COVID-19, concerns of public safety are still in question. Check out a few tips and guidelines from the Center of Disease Control to protect yourself.
Avoid close contact
- Put distance between yourself and other people. (at least 6ft apart)
- Remember that some people without symptoms may be able to spread virus.
- Keeping distance from others is especially important for people who are at higher risk of getting very sick.
Cover coughs and sneezes
- If you are in a private setting and do not have on your cloth face covering, remember to always cover your mouth and nose with a tissue when you cough or sneeze or use the inside of your elbow.
- Throw used tissues in the trash.
- Immediately wash your hands with soap and water for at least 20 seconds. If soap and water are not readily available, clean your hands with a hand sanitizer that contains at least 60% alcohol.
Clean and disinfect
- Clean AND disinfect frequently touched surfaces daily. This includes tables, doorknobs, light switches, countertops, handles, desks, phones, keyboards, toilets, faucets, and sinks.
- If surfaces are dirty, clean them. Use detergent or soap and water prior to disinfection.
- Then, use a household disinfectant. Most common EPA-registered household disinfectantsexternal icon will work.
Grocery shopping/Public Outings
- Sanitize your hands often: Use hand sanitizer before entering the store and after leaving, NC State says. You should also consider using hand sanitizer before and after selecting produce items.
- If your store isn’t providing disinfecting wipes, bring your own wipes to use on carts, basket handles and card readers, according to NC State.
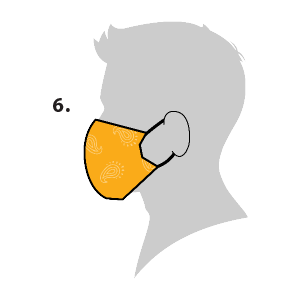
- Wear a mask: The CDC now recommends that people wear cloth face coverings when they go out, including when they go to the grocery store. This recommendation is intended to prevent the spread of COVID-19 from people who are infected but don’t realize it because they aren’t showing symptoms.
- Practice social distancing: As with any public setting, you should maintain a distance of at least 6 feet (1.8 meters) from others.
- Touch only what you buy: Try not to touch things unnecessarily, NC State says. That means don’t pick up multiple produce items to try to find the ripest one, for example.
- Gloves aren’t necessary: Wearing gloves to the store isn’t necessary because the gloves become contaminated the same way your hands do, according to The Washington Post. Washing or sanitizing your hands before and after entering the store is what’s important. But if you choose to wear gloves, use disposable ones and discard them before you get into your car, if you’re driving, or as soon as you get home if you’re on foot or taking public transportation, according to The Wall Street Journal.
- Don’t touch your face: Avoid touching your eyes, nose and mouth with unwashed hands, according to the CDC.
When you get home
- Wash your hands: You should wash your hands or use hand sanitizer after handling food packaging, according to NC State.
- Don’t leave your food outside: Although some people on social media have suggested leaving your groceries in your garage for three days to kill the virus, this is bad advice. Not only is it not scientifically proven, it’s also a food safety issue, according to NC State. Leaving food outside, in your garage or car, may mean that the food is not stored at the proper temperature to prevent bacterial growth; and it could also increase the risk of pests such as rodents.
- Rinse your produce: it’s always a good idea — even when there’s no pandemic — to rinse fresh fruit and vegetables with water to remove dirt, debris and pesticides, and reduce levels of foodborne germs, Benjamin Chapman, a professor and food safety specialist at North Carolina State University, told Live Science previously.
- Don’t use soap: There’s no need to use soap or chemical disinfectants on your produce, Chapman said. Dish soap is not approved for use on foods, and consuming it could lead to nausea and upset stomach, Live Science previously reported.
- Wiping food packaging isn’t necessary: There’s no evidence that touching food packaging is linked with transmission of the new coronavirus, according to the Food and Drug Administration. However, if you are concerned, you can wipe down product packaging and allow it to air dry, as an extra precaution, the FDA says.
- Wash reusable bags: If you use reusable grocery bags (although some states, such as Massachusetts, have banned reusable shopping bags during the pandemic), you should wash them after a trip to the store, either by putting them in the laundry (for cloth bags) or using soap or other disinfectants for plastic bags, according to NC State.
Sew and No Sew Instructions
Sewn Cloth Face Covering
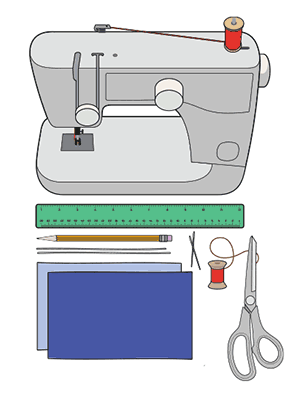
Materials
- Two 10”x6” rectangles of cotton fabric
- Two 6” pieces of elastic (or rubber bands, string, cloth strips, or hair ties)
- Needle and thread (or bobby pin)
- Scissors
- Sewing machine
Tutorial
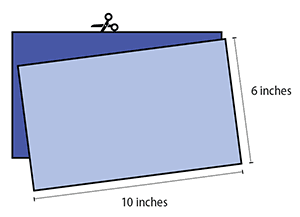
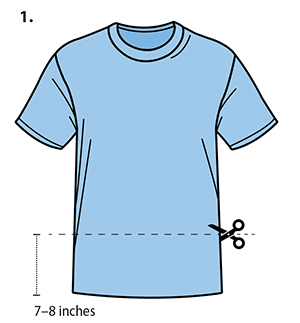
1. Cut out two 10-by-6-inch rectangles of cotton fabric. Use tightly woven cotton, such as quilting fabric or cotton sheets. T-shirt fabric will work in a pinch. Stack the two rectangles; you will sew the mask as if it was a single piece of fabric.
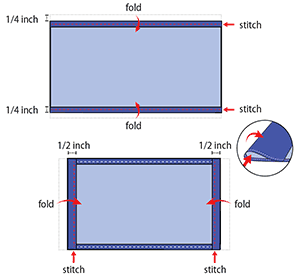
2. Fold over the long sides ¼ inch and hem. Then fold the double layer of fabric over ½ inch along the short sides and stitch down.
3. Run a 6-inch length of 1/8-inch wide elastic through the wider hem on each side of the mask. These will be the ear loops. Use a large needle or a bobby pin to thread it through. Tie the ends tight.
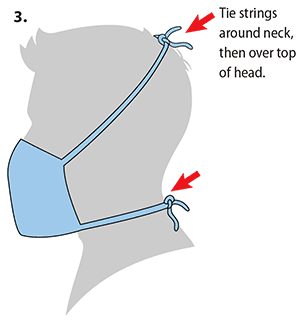
Don’t have elastic? Use hair ties or elastic head bands. If you only have string, you can make the ties longer and tie the mask behind your head.
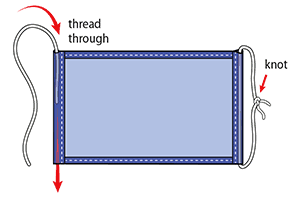
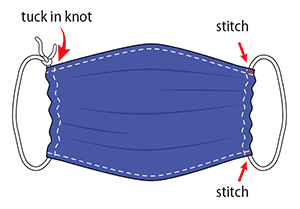
4. Gently pull on the elastic so that the knots are tucked inside the hem. Gather the sides of the mask on the elastic and adjust so the mask fits your face. Then securely stitch the elastic in place to keep it from slipping.
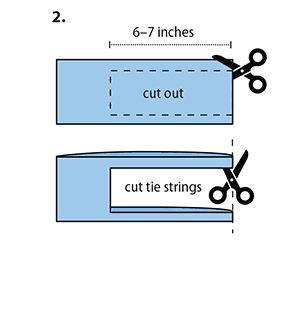
Quick Cut T-shirt Face Covering (no sew method)
Materials
- T-shirt
- Scissors
Tutorial
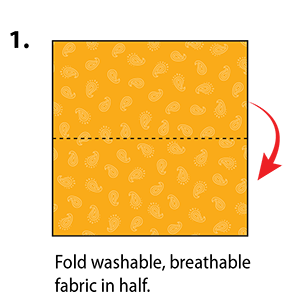
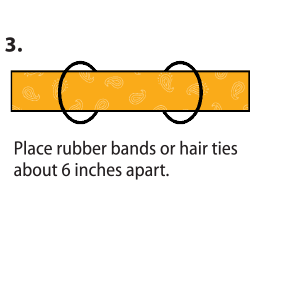
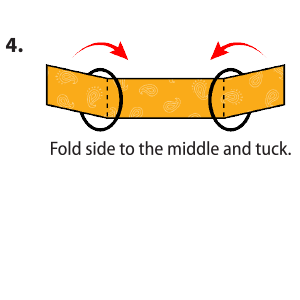
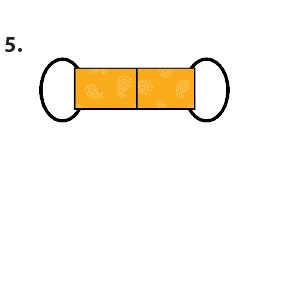
Bandana Face Covering (no sew method)
Materials
- Bandana (or square cotton cloth approximately 20”x20”)
- Rubber bands (or hair ties)
- Scissors (if you are cutting your own cloth)
Tutorial